

I'd love to show you how I made these lace earrings, inspired by a pair I saw at Anthropologie last weekend. These earrings were so simple to make, and I love the vintage, time-worn feel to them. I love making jewelry, but you do NOT have to have a lot of jewelry making experience to make these earrings. The jewelry tools are a good investment, and they are honestly not expensive, especially with a good old 40% or 50% off coupon. :)
Materials:
-a piece of crochet-look lace, maybe 1/4 yard (I got mine at Joann's for $1, regular price)
-chain
-jewelry findings: earrings (ear wires) and metal ring things (jump rings)
-scissors
-jewelry tools
-disappearing ink pen
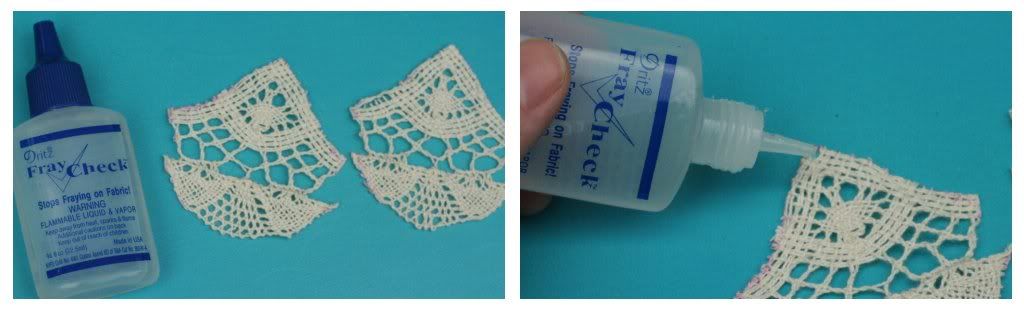
-not pictured but VERY essential to this project: Fray Check

1. With the disappearing ink pen, trace the part of the lace that you would like to make up the earrings.

2. Cut out the pretty new lace shapes. I'm a fan of the more "teardrop" style. :)

3. Run a line of Fray Check along the edges of each lace piece, being careful with the lace since it will probably unravel quite easily. I let the Fray Check dry overnight and put another line along the edges of the lace the next day and let dry. I wanted to make sure those puppies weren't going to unravel on me!
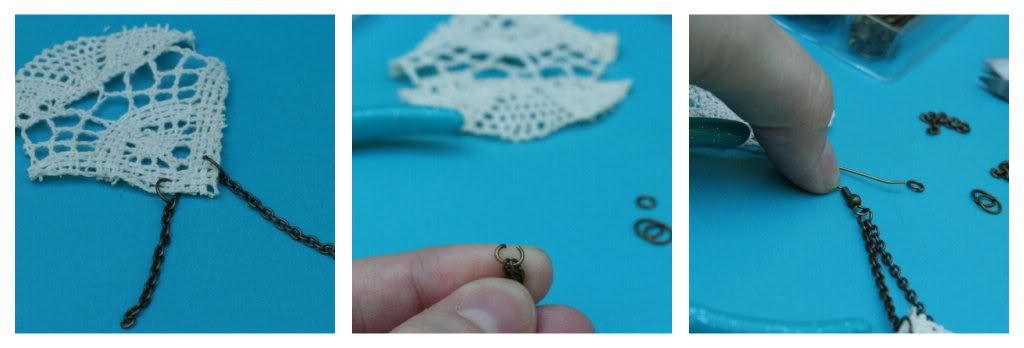
4. Measure and cut 4 equal pieces of chain. I started out with them each being 1 1/2" long (but as you'll see shortly, I cut the chains down a but because the earrings were much too long for me... you can always cut the chain, so overestimate!). Then, using 2 larger jump rings, connect them to the top of the lace, making their spacing even.

5. Attach the chains to the jump rings. Then, connect the ends of the chains with a small jump ring, and add an earring wire to the small jump ring. Close the jump ring securely.
6. Pretty. Try the earring on!

7. If the earring is too long, cut the chains down to make the 1" long and reattach. Try the earring on again and see if the length is to your liking. If not, feel free to shorten again, but I ended up stopping here and using the 1" chain length.

8. Repeat steps 4-7 to make the other earring. Try them on and love your new vintage-look accessories (that cost wayyy less to make than their $32 inspiration earrings)!

I love these earrings! You could also try tea-dying the lace, dying the lace with different colors (like the Anthro ones) or even crocheting your own (if you have that awesome skill, which I definitely DON'T but hope to someday!) and attaching the earring findings to them. Enjoy!

Ooooh! How scrumptious are those?! We are so tickled to feature Ashley, um hello? Can you say talented?! I would have never in a million years thought to make my own lace earrings.. So splendid! We need to have her stop by again {hint, hint, Ashley :}
If you would like to {tute} your own horn and send us a post to be featured on Tute Sweet Tuesdays, you can email us at truliescrumptious{dot}com.
Happy Tuesday everyone!
P.S. Don't forget about our Goody Goody Giveaway going on. Enter to win one of Ashley's treats from the Poppy Chain Boutique

Oh, these are just too cute! What a fun concept!
ReplyDeletelove this post!! can't wait to try it!
ReplyDeleteThese are so perfect. I am in love!
ReplyDelete